

How To Change Render Settings In Premiere Pro
If you're unsure about Premiere Pro's Maximum Render Quality (MRQ) and Maximum Bit Depth (MBD) settings, y'all're not alone. Information technology'south pretty complicated stuff, and it doesn't help the official documentation can be hard to find.
Then why exercise nosotros see these in both Sequence Settings and in Export Settings? And how do they touch on our video? In this article, we'll swoop into how and when these settings work, so that you can make the best option for your own projects.
If you don't take the fourth dimension to read all the technical details you lot can skip directly to the determination. (TL;DR just plow both settings on in both Sequence Settings and Consign Settings.)
At the end of the article, you'll also find the tests I used to prove how these settings affect export times and prototype quality. These will exist referred to during the article.
Where practice we detect these settings?
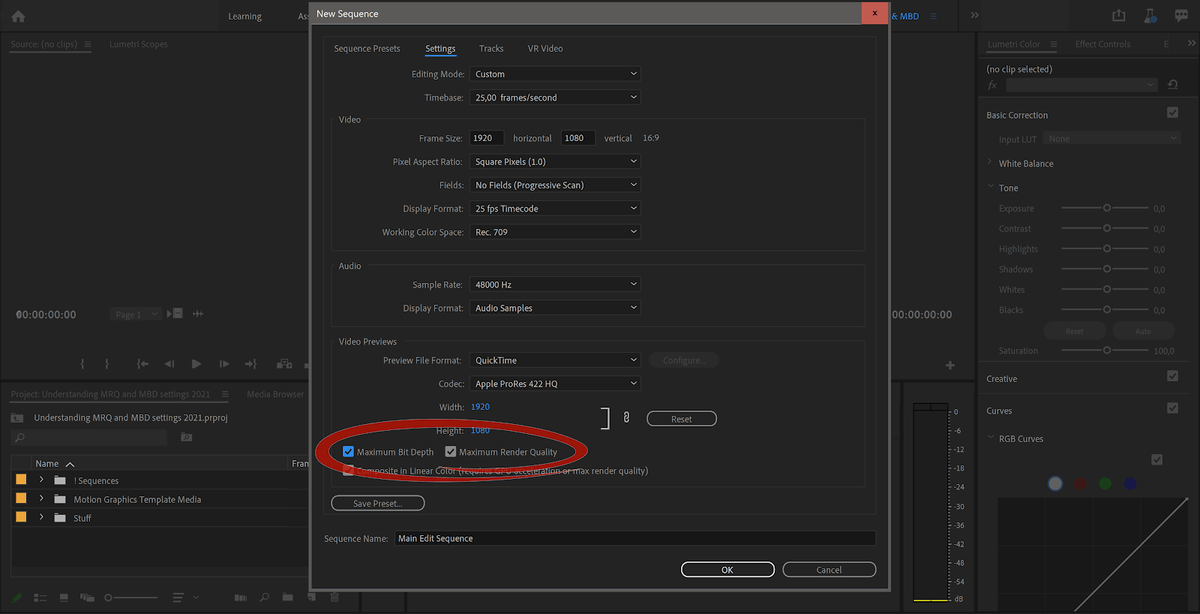
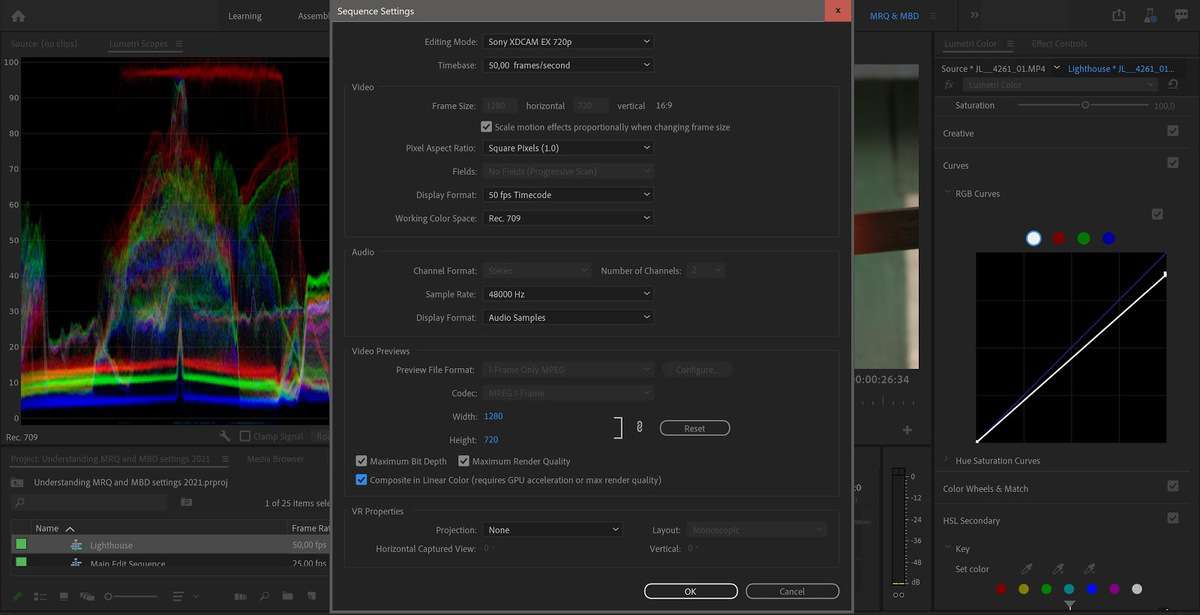
Y'all'll detect both the Maximum Return Quality and the Maximum Bit Depth settings in at least 3 different places in Premiere Pro: In the New Sequence dialog, in the Sequence Settings and in the Export Settings.
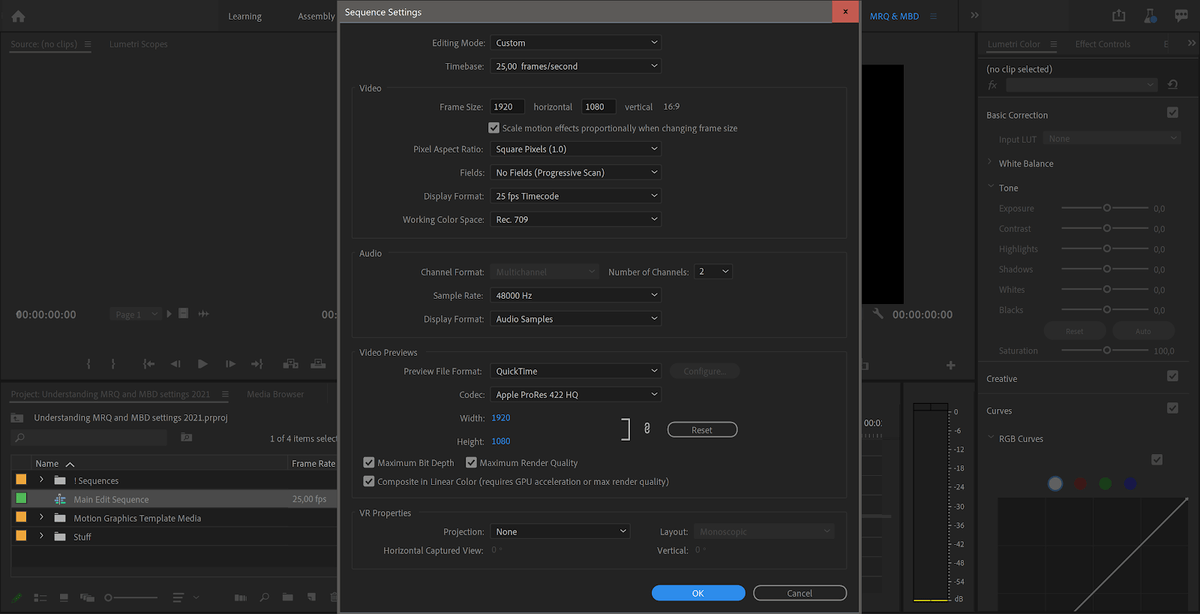
If y'all create a new sequence manually in Premiere Pro (File > New > Sequence), yous'll come across this dialog.
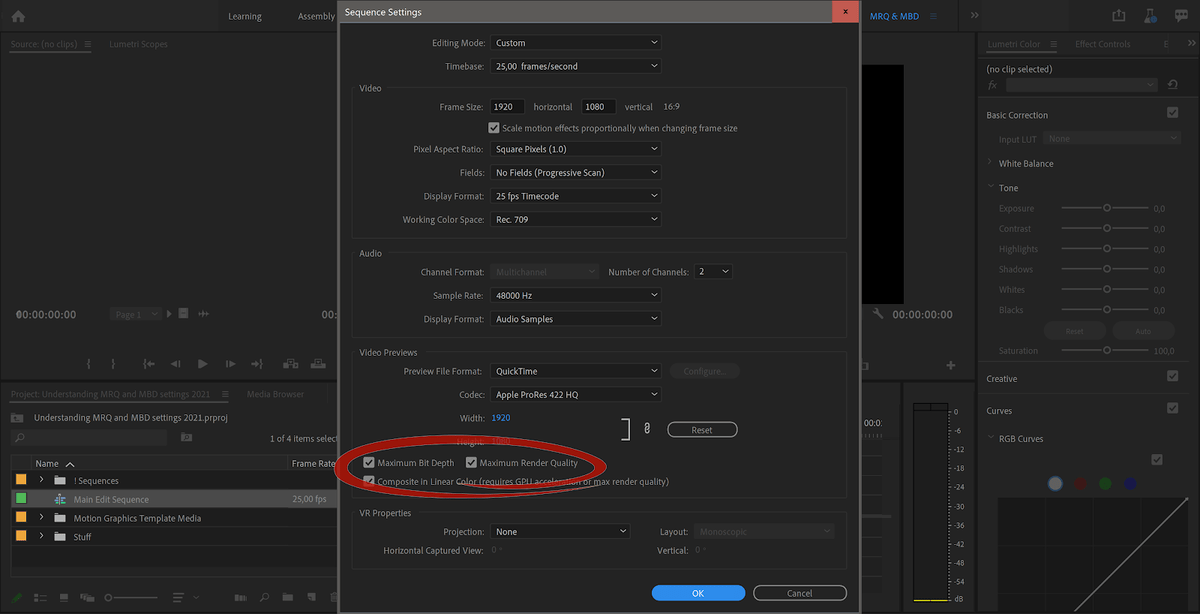
If you've already created a sequence, and didn't pay attention to the settings, y'all can go to Sequence Settings (Sequence > Sequence Settings) and change them there.
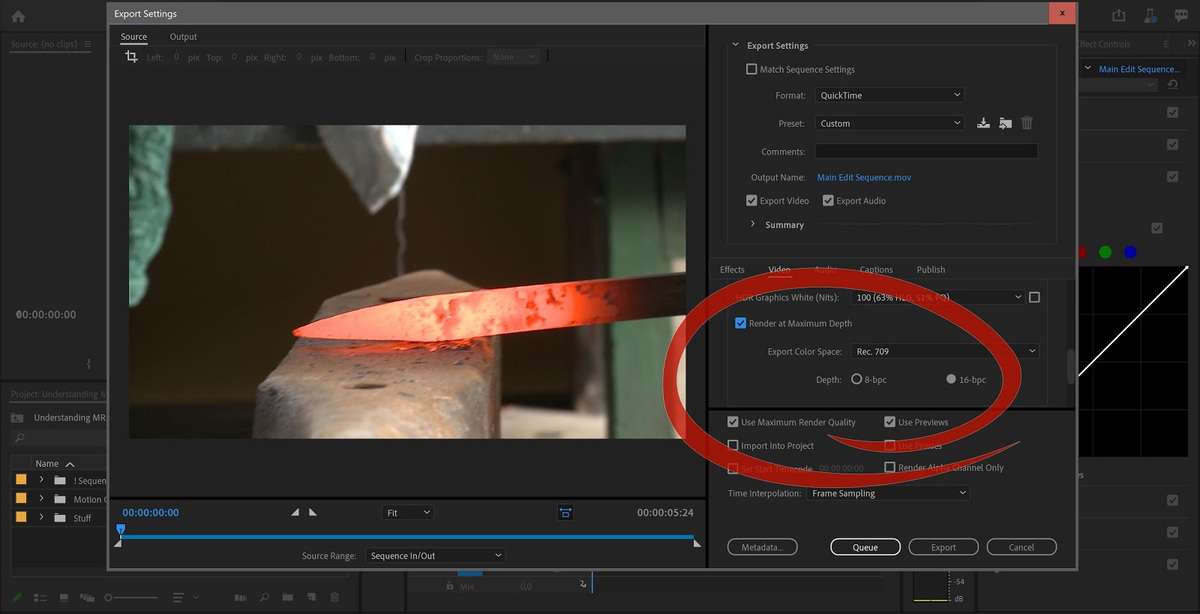
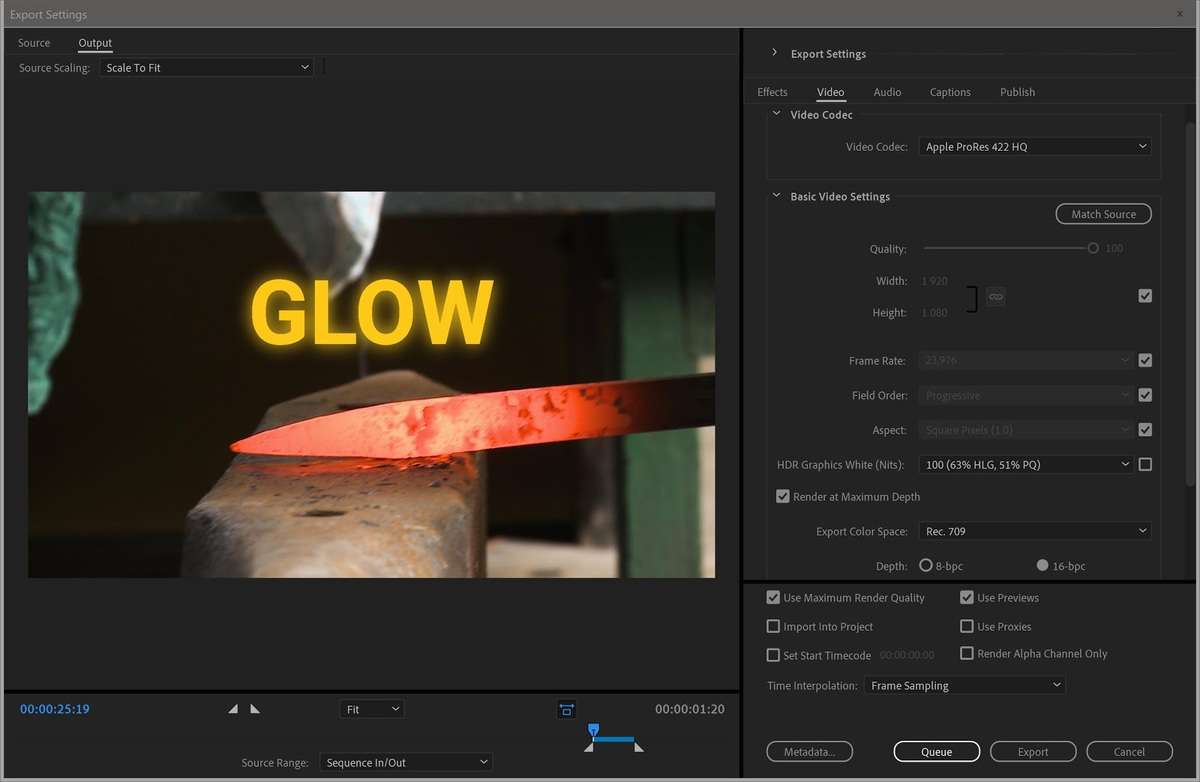
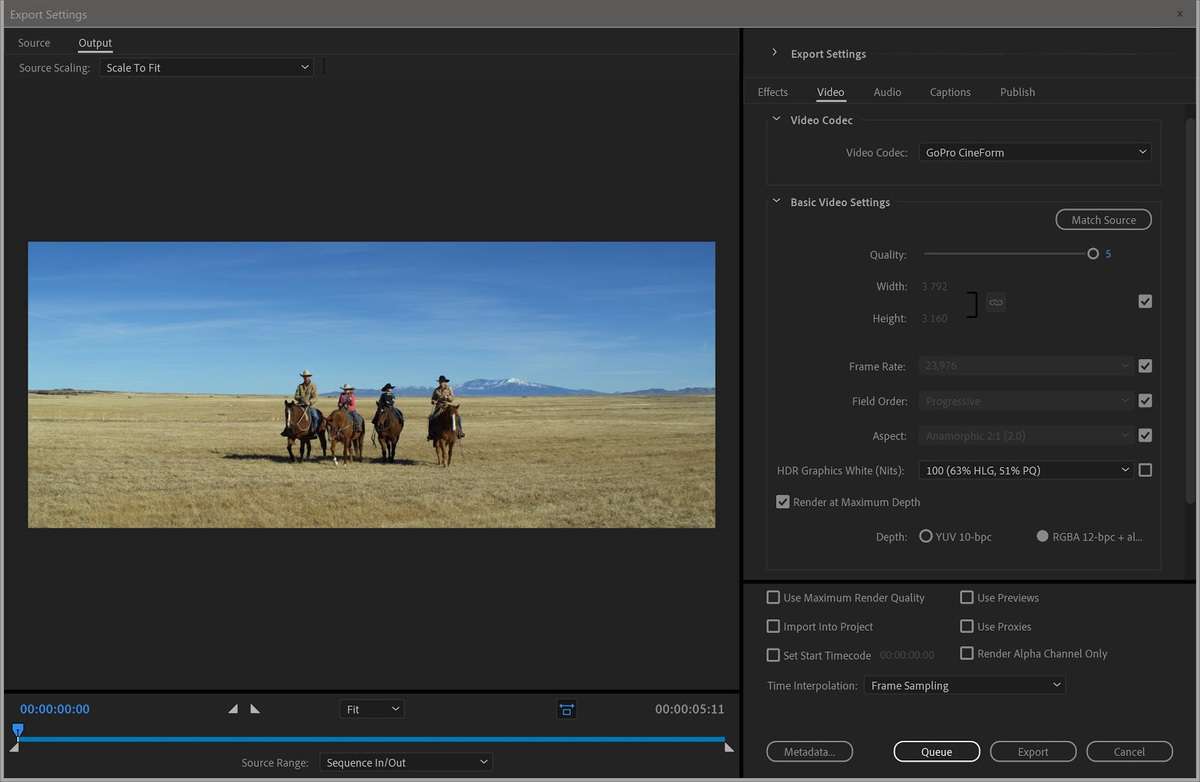
When you export your timeline, you'll see the same settings, one under the Video tab and one in the bottom role of the box.
OK, with that out of the way, let's meet what happens when you enable these settings in your sequence.
You'll be warned
Yep, if yous choose to activate any of these 2 settings, you'll go the following warning.
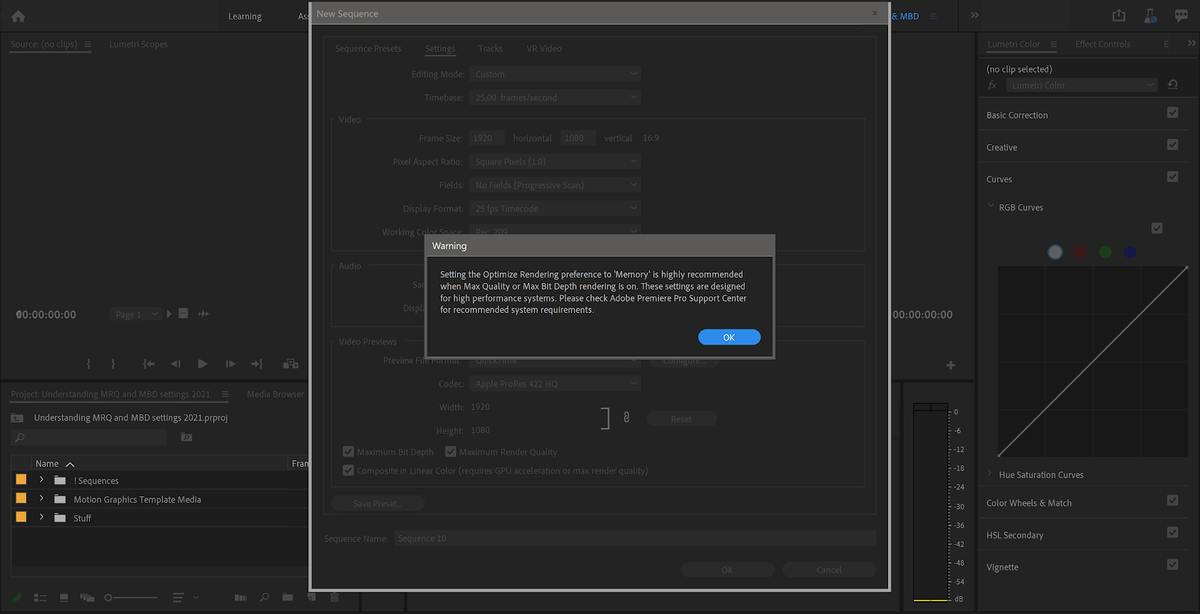
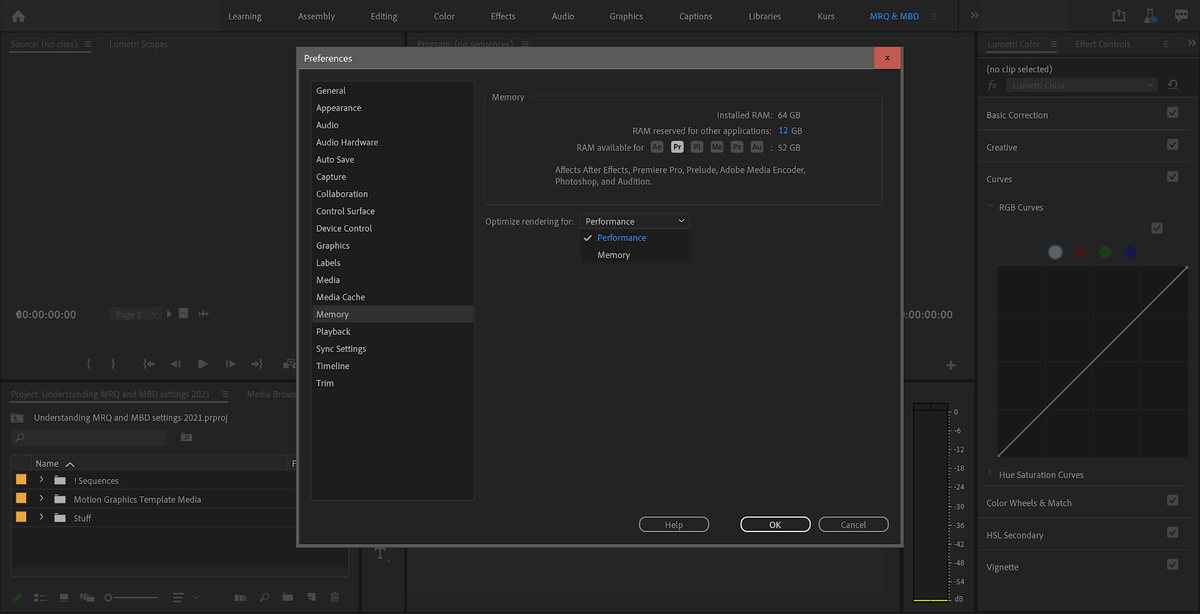
This isn't as scary as it looks. But if you think it's a cause for concern, you lot tin can go to the Preferences for Memory and set it to Optimize rendering for Retention. Or ignore the message altogether, thinking "I have lots of RAM" like most of us do. Unless you lot take a high-cease computer with a super-high core count you shouldn't run into memory-related trouble with whatever of these settings. I always take my memory preferences set up to Optimize rendering for Performance.
Even though the warning says that information technology's "highly recommended" to set this to Memory, some users have reported that doing this volition make their systems less stable. I get out this prepare to the default, which is Performance.
What does Maximum Flake Depth practice?
At starting time glance, it seems that the Maximum Flake Depth switch just forces Premiere Pro to render supported furnishings in 32-bit with floating point accuracy. This is good because it will reduce banding and other artifacts while also keeping overbrights and super-blacks intact, never clipping levels.
The Maximum Bit Depth switch too requests 32-bit float from the importer, which is otherwise only 8-bit.
What does Adobe say?
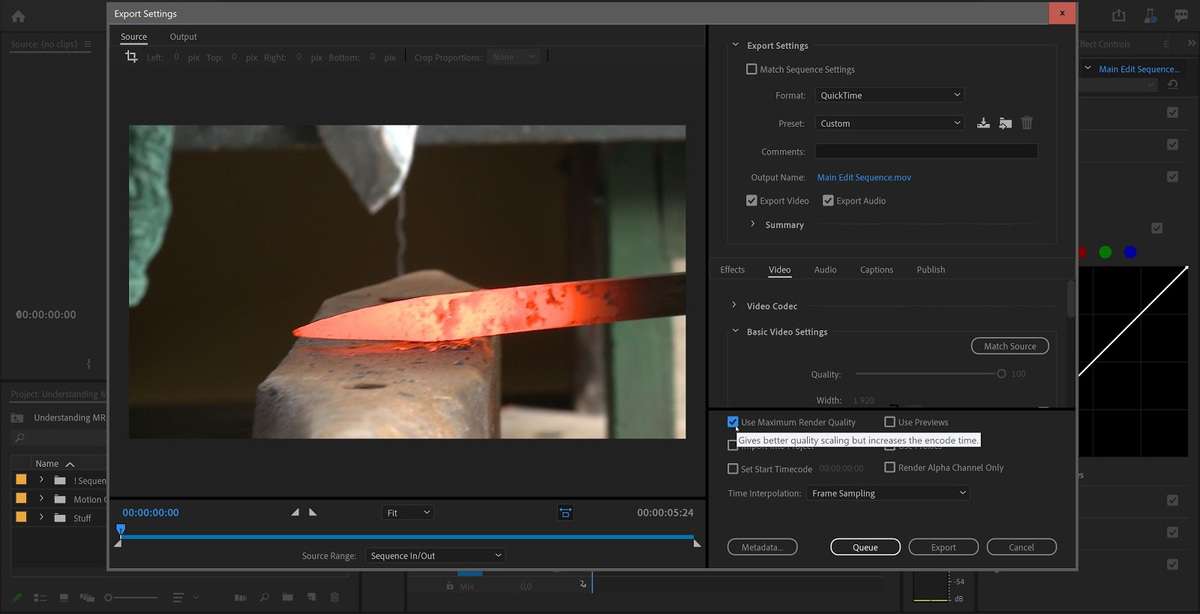
This is the explanation that Premiere Pro offers you when you hover the pointer over the Return at Maximum Depth button in the Export Settings.
"Rendering at maximum fleck depth improves the video'south quality but increases how long encoding takes."
This tin can exist disruptive. What does "Improves the video's quality" mean? This caption is also not the full picture: it doesn't necessarily increment the encoding fourth dimension. More on this later.
For some reason there is no tooltip for Render at Maximum Depth in Premiere Pro 15.0, and so yous're left to your ain interpretation for that i.
Why does it affair?
Let's accept a look at the rendering of video frames start. This can exist done in viii-bit per channel, or in 32-bit per channel. If you've called GPU rendering (CUDA, Metallic or OpenCL) in the Projection Settings, information technology will ever be washed in 32-bit unless you've used effects that are not GPU-accelerated.
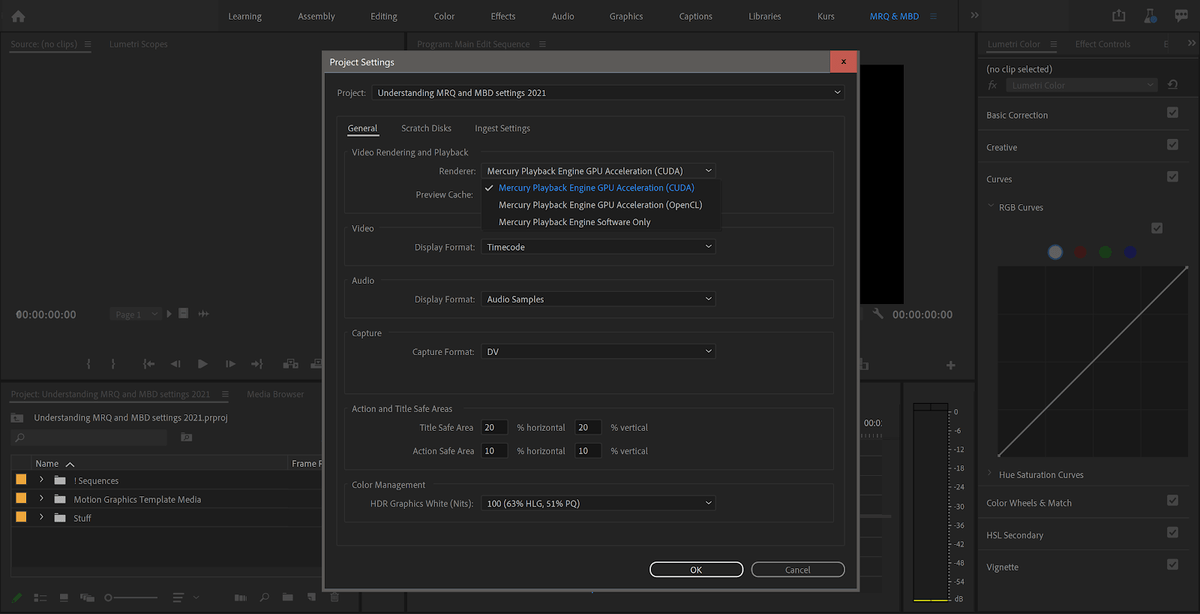
If Software Only is chosen in the Project Settings, the bit depth depends on the Return at Maximum Depth switch. If it'southward on, rendering volition be done in 32-scrap. If not, it'll exist done in 8-scrap.
viii-bit means the result of every calculation on the image can only accept 256 possible levels per channel (RGB or YUV). That's not a lot of accuracy. With multiple effects on a prune, this ways nosotros'll get rounding errors for each calculation, with the danger of introducing banding and blocking.
In 32-bit, we're doing all calculations with results that can have more than 4 billion different levels per aqueduct, so rounding errors with multiple effects are totally eliminated. We can as well shop levels way across 100% white and 0% blackness.
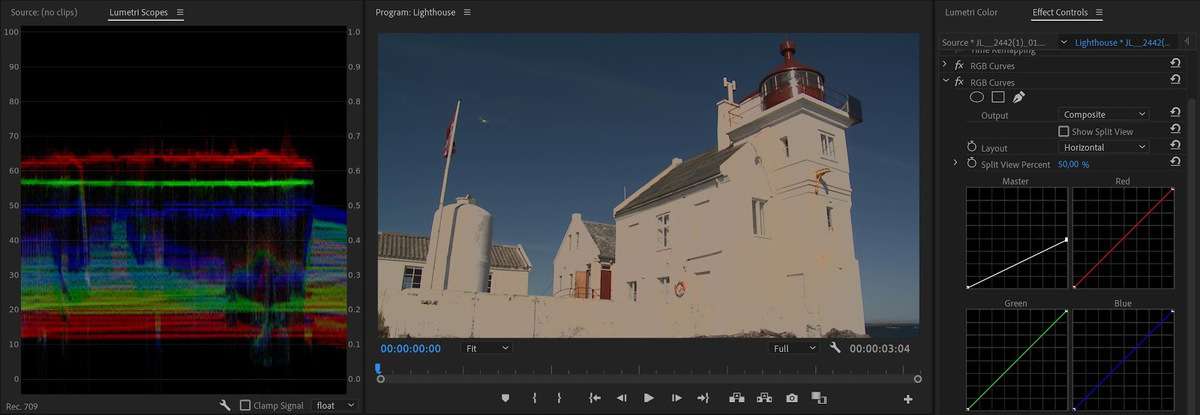
Here'southward a skillful test to do if y'all desire to see the difference betwixt 32-bit and eight-fleck rendering. Employ a clip with some highlights shut to maximum.
Apply the onetime trusty (and obsolete) RGB Curves outcome to force levels way beyond 100% white. (You lot can't use Lumetri Color for this because it clips levels when stacked.)

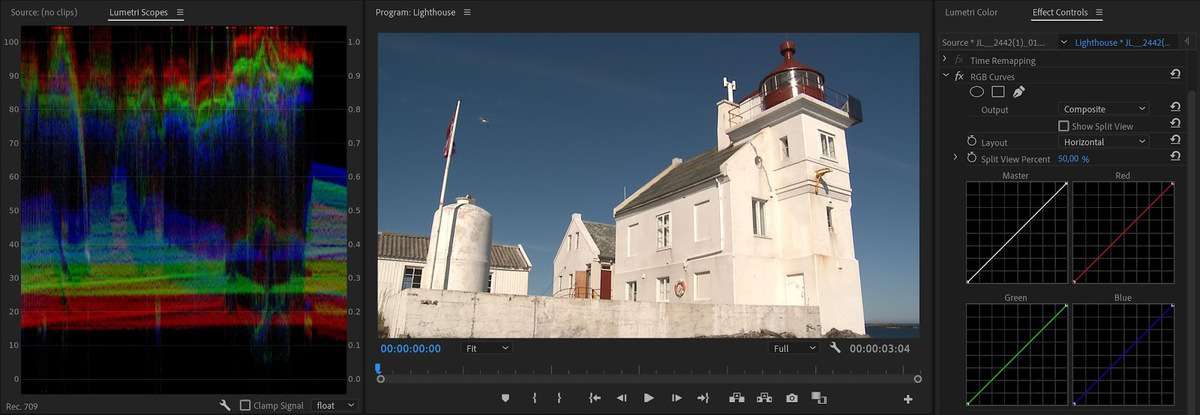
At present permit's add together some other instance of RGB Curves, where we drag the whites way downwardly again.
Considering we're rendering in 32-chip using the GPU, the overbrights were not clipped, and the image looks normal. Now permit's switch to Software Merely in the Project settings and see what nosotros get.
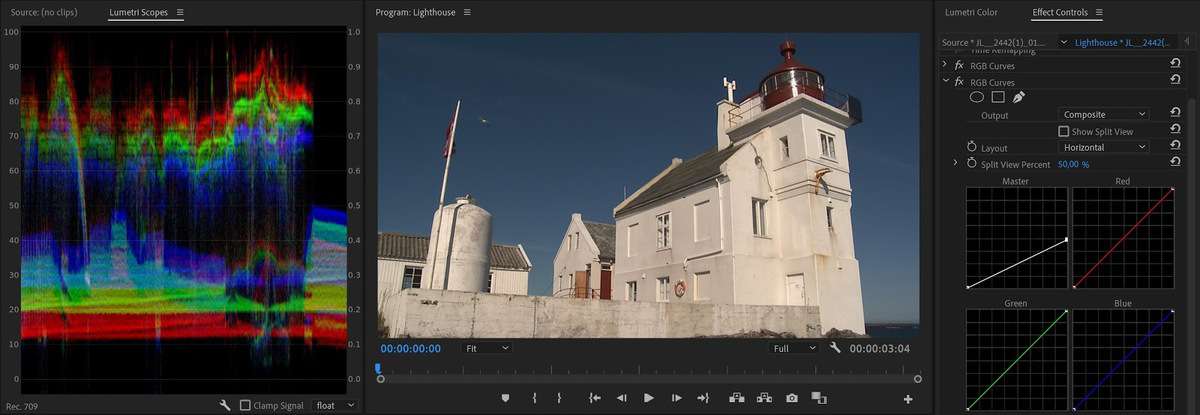
Rendering in 8-fleck, the overbrights were only clipped, and lowering the levels once again but makes the clipped levels darker. Lots of detail is lost.
At present permit's activate the Maximum Fleck Depth switch in the Sequence Settings.

That'due south nearly identical to the result we got with GPU rendering. And then if you're working in Software mode, you should definitely tick that Maximum Bit Depth box.
Of course, these were extreme adjustments just to make the divergence obvious. You wouldn't normally do this. But we often end up having more 1 adjustment on one clip. For example, you might add together a LOG to Rec.709 LUT as a Source Clip effect, then normalize the image in the timeline, and so add an aligning layer with a look.
That's three adjustments on one prune, and any intermediate levels that become higher up 100% would be clipped in 8-bit, losing item. You can too starting time to see banding in gradients etc. Make sure you're rendering in 32-bit, and these problems are non-real.
How can you tell if a clip is rendered in GPU way or Software Only mode?
If yous've activated GPU acceleration (CUDA, Metal or OpenCL) in Projection Settings, it'southward reasonable to assume that you'll always go the best algorithm. But that's not always the case, and it'southward more complex than it first appears.
If Software Only is chosen in Project Settings, you lot're obviously getting Software rendering. But fifty-fifty when you cull GPU rendering in the Project Settings, some of your clips may be rendered using Software mode. Add together a non-accelerated effect or transition, and a function of the rendering of each frame will be done in 8-bit, potentially clipping levels and introducing rounding errors and banding.
Such non-accelerated effects include mutual tools like Camera Blur and Unsharp Mask. These aren't written for the GPU, and have to be calculated on the CPU.

Beware of the Red Render Bar
The return bar can give you some clues about what's going on. Areas of the timeline with no render bar at all don't accept any effects, so what y'all're seeing should be what you get. If yous've called GPU rendering in Projection Settings and you see a yellow return bar in the timeline, then you too know you're definitely in GPU way, and you're safe.
A cherry return bar will ofttimes be a sign that you're rendering in Software mode, but it'southward not a clear identification. It might too betoken that you're using a GPU-accelerated effect that needs rendering, similar Optical Menses frame blending for Speed, or the Morph Cutting transition. Yes, those need to be rendered—hence the red render bar—but they volition be rendered on the GPU in 32-bit. And then a red return bar doesn't e'er mean you lot're in Software mode.

Information technology turns out there is no simple or straight way in the timeline to tell if part of your rendering is washed in Software mode. So, how tin can y'all notice out if a clip that triggers a red render bar does and then because of Software rendering or non?
First, y'all need to detect out if the clips in the area with a reddish return bar have furnishings on them. That'south the easy part. If the fx bluecoat is gray, at that place are no effects on the prune. If it'due south yellow, yous should also be good, since that means only the fixed effects (Motion, Opacity etc.) have been changed.
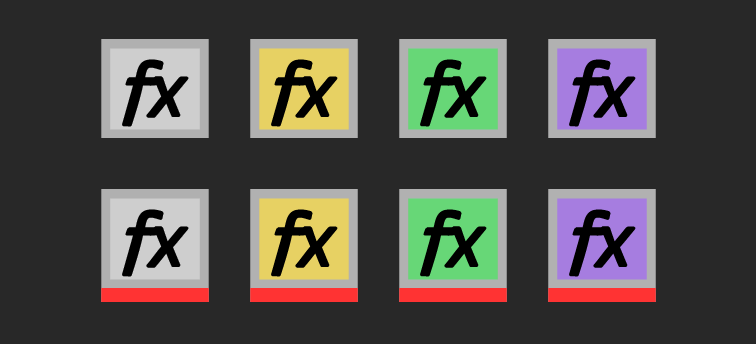
If there's a red line under the badge, it has a Source Clip effect on it, and if it's purple you've added an effect on the clip in the timeline. When it turns green, that ways y'all've used an upshot, and that yous've also inverse one or more of the stock-still effects. The short version of this is that y'all simply need to worry about clips with dark-green and majestic badges, and those with a ruby line under the badge.
You lot can check the Effect Controls panel to encounter if any of your clips accept a non-GPU-enabled consequence. If the clips have only GPU-accelerated furnishings, you're good. If one or more clips do have a non-accelerated issue, then some of the calculations will be washed on the CPU.
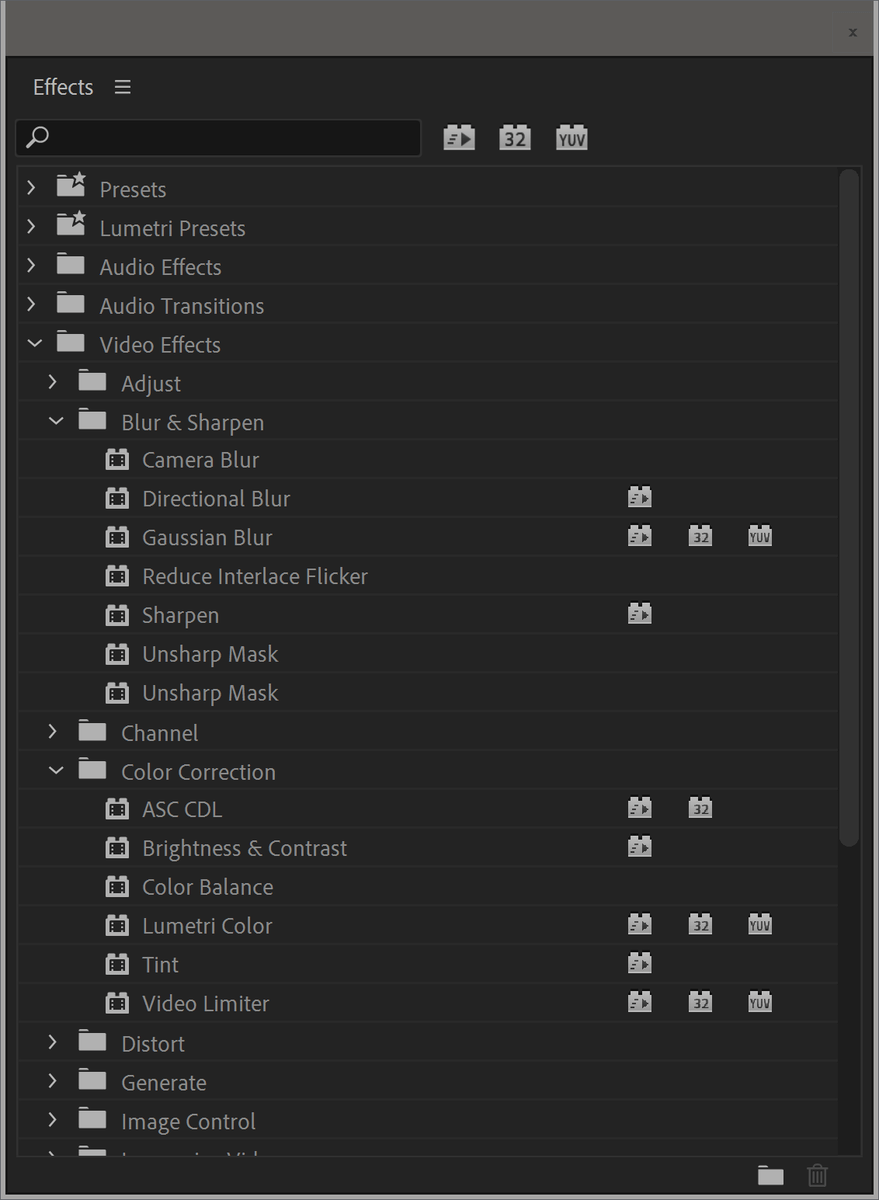
If you don't know what effects are GPU accelerated yous can observe out past looking at the Lego brick icons in the Furnishings panel.
But the Consequence Controls panel only shows effects on one prune at a time, so information technology volition have a while to go through all the clips. Here'southward a faster way to see all the furnishings on all those clips: Select the clips y'all want to inspect and click Edit > Remove Attributes. This will show all the effects that have been used on those clips.

It won't evidence which prune has which effect, but you probably know your timeline well plenty to accept a skilful idea of what'southward been used where.
What nigh Preview Renders?
Your sequence settings won't normally bear on your final consign, because the Export Settings panel has its own settings for Maximum Bit Depth.
If y'all plan to apply preview renders for export, you'll exist pleased to learn that setting the preview file format to something similar ProRes 422 HQ will decode and render your previews in 10-bit, even when the sequence has Maximum Bit Depth gear up to off. So it's e'er safety to use high-quality preview renders.
This is a good affair, but it as well means you'll run across a visible change in the image under video overlays similar lower thirds if you render that office of the timeline with Maximum Bit Depth set to off in your Sequence Settings.
Maximum Fleck Depth affects the decoding of some formats
The Maximum Bit Depth switch also requests 32-bit float from the importer, which is otherwise only 8-bit. So a little-known fact is that MBD also affects the mode some video formats are imported/decoded. This means it can impact some video formats more than others—even when y'all're in GPU Dispatch mode.
For some formats, like RED, this is required to get HDR pixels. For instance, RED RAW is 12-scrap, and Maximum Chip Depth chooses between decoding the frames at 8-bit vs using the full 12-bit.
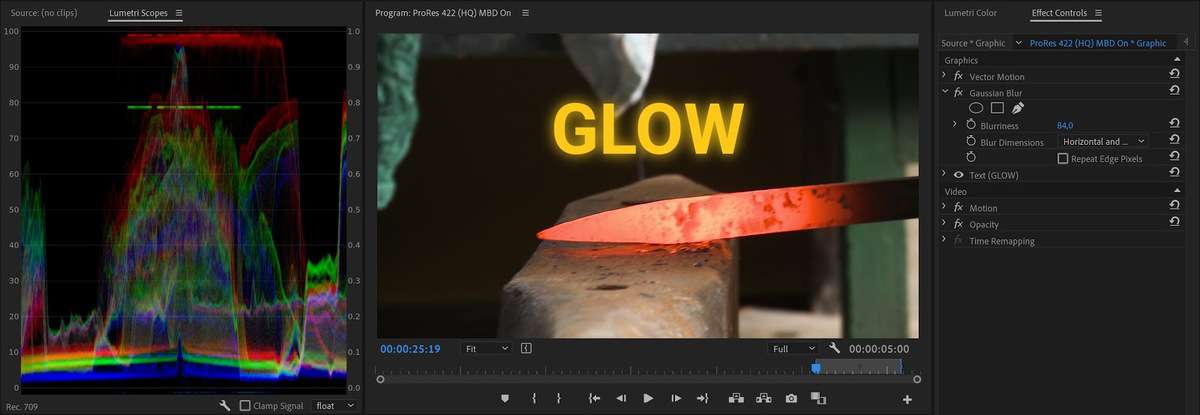
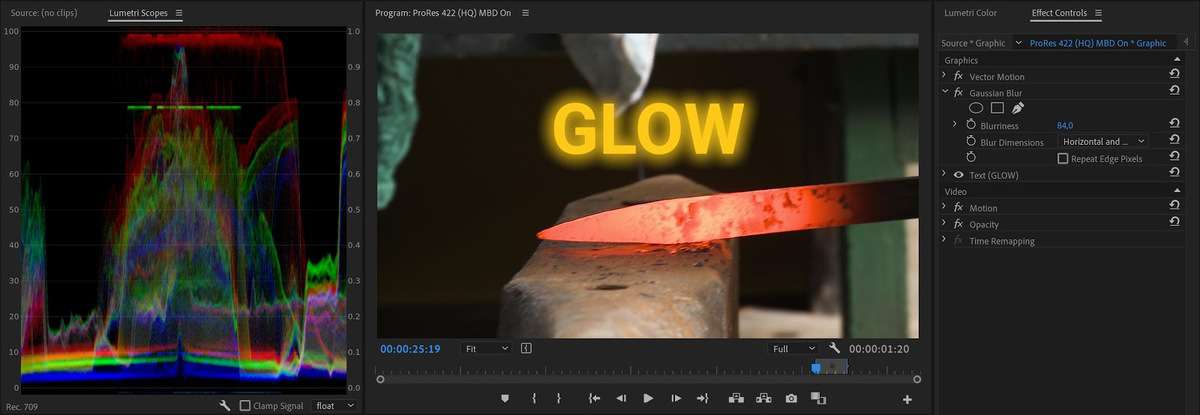
In that location's no list of what these formats are, but editors using ProRes should know that without MBD set, ProRes will be decoded in 8-fleck, even though the ProRes source is ever 10-bit or more.
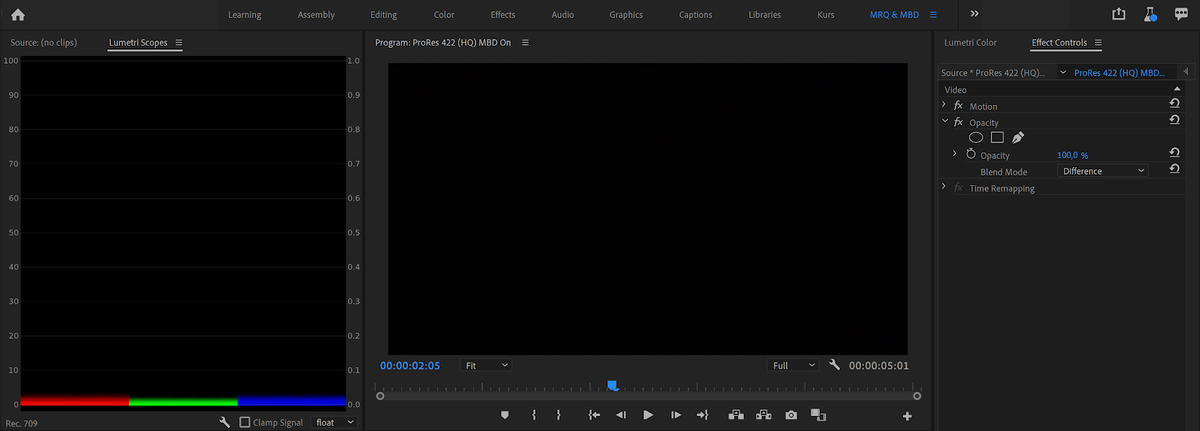
So when you don't have this switch enabled in Sequence Settings, your glorious ProRes footage is likely to show banding in the Program Monitor, and in the Lumetri Scopes.

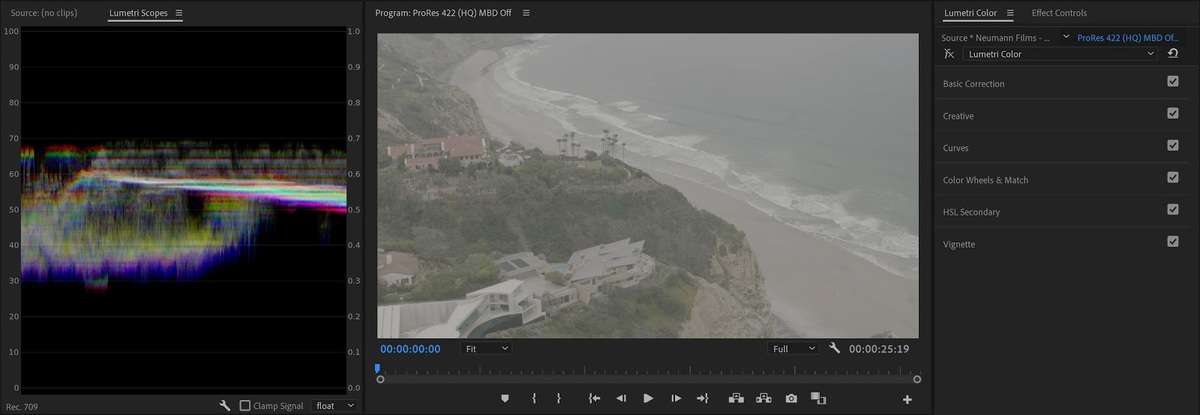

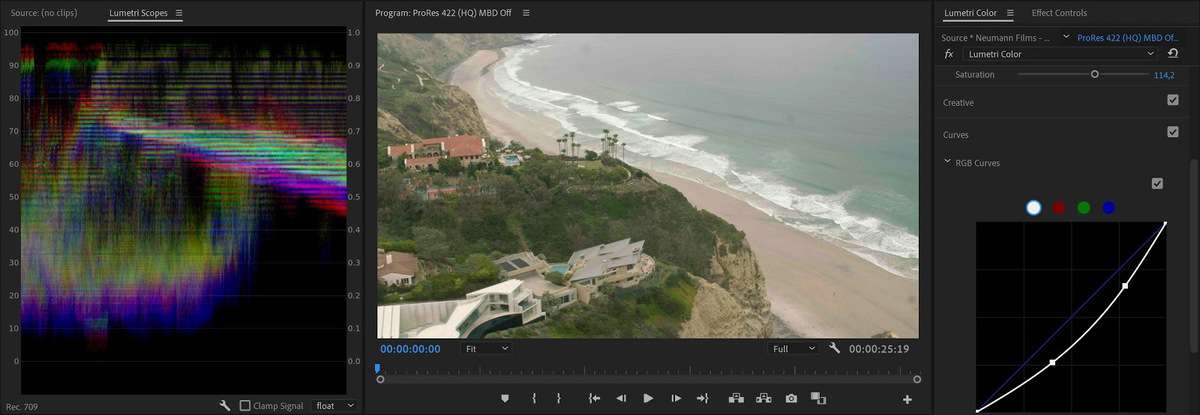
Without Maximum Bit Depth prepare, ProRes will be decoded in viii-chip.
So, if y'all want your program monitor to show something that resembles the final output while you're colour grading, y'all definitely want to enable Maximum Scrap Depth in Sequence Settings.
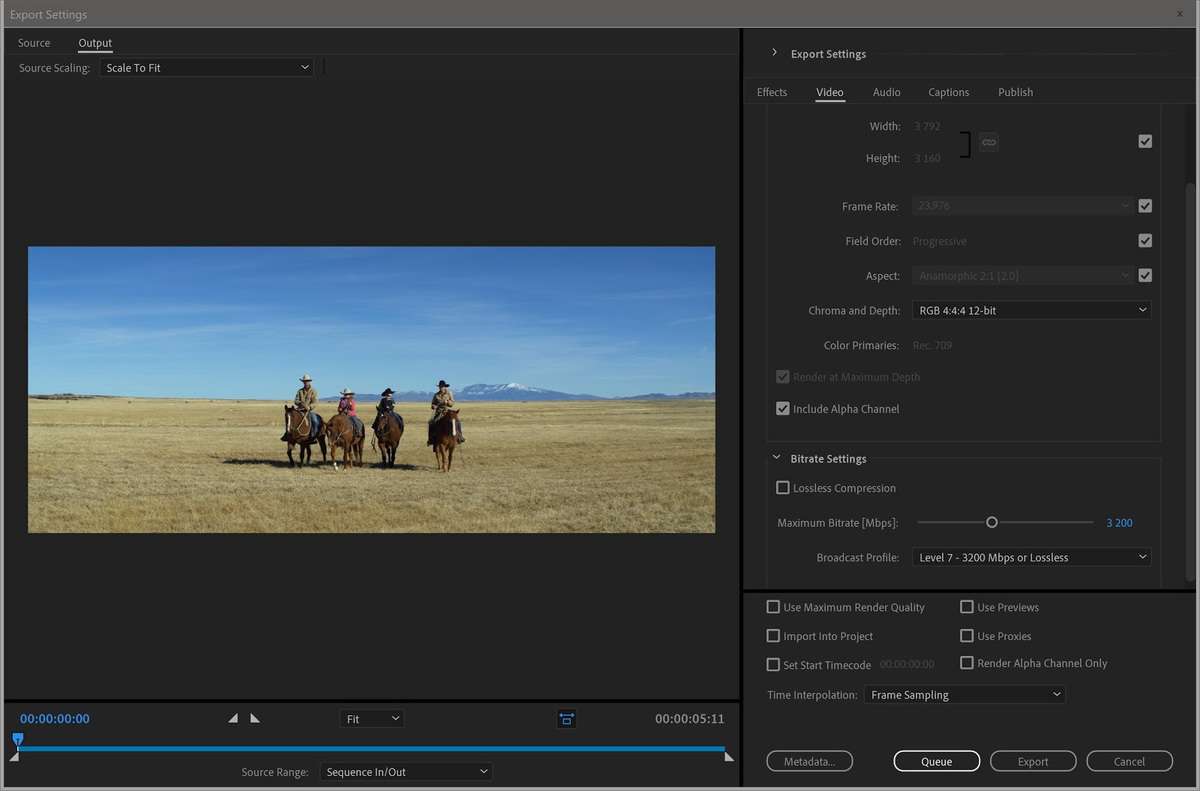
The often-overlooked Depth choice in Export Settings
Don't confuse the Render at Maximum Depth setting with the Depth setting that appears immediately below it in Export Settings for some formats. The Return at Maximum Depth tick box refers to the accuracy of the calculations, while the Depth setting below refers to the bit depth of the encoding.
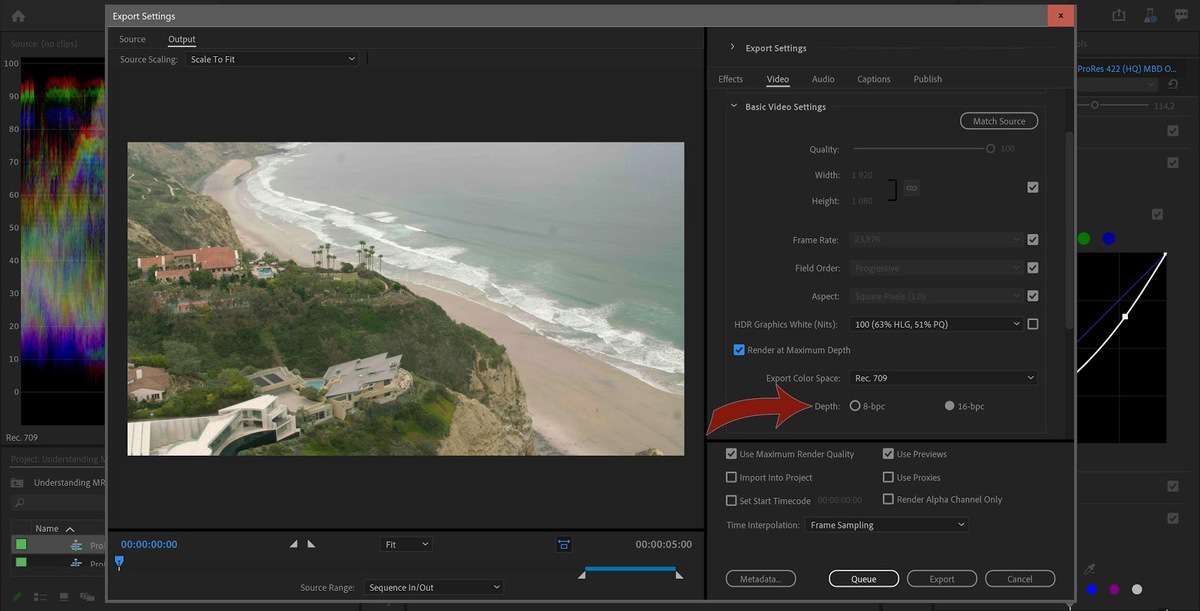
And then the Depth setting decides if the rendered file will have viii-bit video, 10-fleck, or more than. And so even with Render at Maximum Depth ticked, ensuring that calculations are washed in 32-bit, you'll actually be exporting to viii-bit video if you lot don't set it to 16-scrap!
To ensure high-quality output, ever use 16-flake depth when exporting to ProRes
For some strange reason, all the presets default to 8-bit—presumably a option of performance over quality—but this leaves y'all open to banding and blocking.
Since the 8-fleck vs 16-bit value isn't stored visibly in the file, the 8-flake file will pretend that it'south 10-bit for all flavors of ProRes 422, and 12/xvi-bit in ProRes 4444. This volition show in Backdrop in Premiere Pro, and in software like MediaInfo.
It'south lying to you.
Note that when Smart Rendering kicks in, this setting has no effect. But if you have an overlay similar a Text layer, or you've added furnishings similar Lumetri, Premiere Pro volition export in 8-fleck if Depth is not set to sixteen-chip. If yous have rendered previews of the segment, and cull Use Previews, the setting will not affect the output.
Likewise, note that the Lucifer Sequence Settings characteristic in Export Settings is set to Maximum Bit Depth if your sequence has this enabled, merely the Depth is set to viii-flake, making fifty-fifty this feature unusable for high-quality ProRes export.
What does Max Render Quality do?
MRQ, when active, volition give y'all sharper images after scaling because it enables a higher-quality Lanczos interpolation method instead of the default bilinear. This is why it likewise increases the consign time when active.
Sounds pretty elementary. But does it affect other things than scaling? You bet. And what kind of algorithms are we looking at here?
OK, but what does "Better Scaling" mean, exactly?
To reply this question, let's leave Premiere Pro for the moment, and have a look at Photoshop, instead. You may have seen that Photoshop has several scaling algorithms to cull from. Bicubic, Bicubic Sharper, etc. And they all have unlike pros and cons.
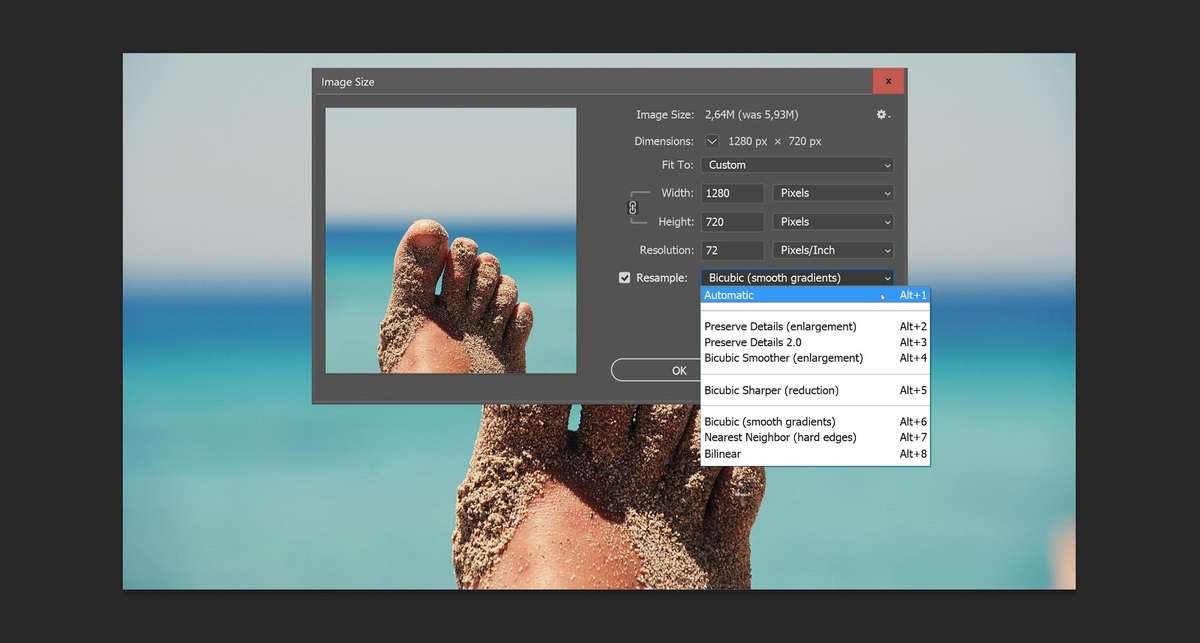
Why do we have and then many to choose from? Because sharp isn't always what y'all want. Some algorithms are better for graphic elements and text, while others are improve for "natural images". Some work better when scaling upward, while some work ameliorate when you lot're scaling down. Colin Smith at PhotoshopCAFE has a adept explanation in his video tutorial.
Back to Premiere Pro, and "better" seemingly equals sharper. And so that's the get-go slightly inaccurate statement in that tooltip text. The second inaccuracy is that it simply mentions Scaling, despite it actually affecting all the Transform options, including Calibration, Position, and Rotation—plus any effects that practise Scale, Position, and Rotation, like the Warp Stabilizer.
Merely like the caption for Max Bit Depth, the explanation in the tooltip is also wrong: information technology doesn't necessarily increase the encoding time. If y'all have GPU acceleration enabled, it will not increase the encoding time. See Examination 7
When does it kick in?
If you lot've used only GPU-accelerated effects and have a yellow timeline render bar, or no bar at all, it will not kick in, every bit the GPU scaling algorithms are even better—and yet faster—because they're done on the GPU.
If the render bar is reddish, it may boot in. Well-nigh probable it will, because yous've used a non-accelerated effect. Simply there are some exceptions. Just like the Max Bit Depth choice, Max Render Quality volition not kick in if the render bar is reddish because you've used morph cut and haven't rendered yet. That transition is rendered on the GPU, so MRQ will not kick in.
And remember—it affects Transforms (even though information technology only mentions scaling in the Export settings). And so if you haven't scaled, moved, or rotated anything, it won't do its thing. If you've adjusted or keyframed Position, Rotation or Calibration (including Scale or Set to Frame Size), you lot may take triggered these algorithms.
Then again, you might exist scaling without realizing it. For example, Warp Stabilizer introduces scaling, rotation and repositioning. And if you've used default Fix to Frame Size, you lot may exist scaling without knowing it. Of course, if you're outputting to a different size than your sequence (say, exporting Hd from a 4k timeline), then you most definitely are scaling.
Some facts that may surprise y'all
Every bit yous've seen, the level of complexity is surprisingly high for such a simple goal: Give me the maximum quality output. Non but is it complex, but the different settings are placed in different corners of the software—and they all need to be ready correctly.
Many of united states will struggle to find, understand, and correctly apply all these settings.
But there's more than. Here'southward some info that may or may non surprise you.
Premiere Pro has several different scaling algorithms
Adobe described how and when the unlike scaling algorithms piece of work in a blog postal service from 2010.
Here'due south an overview I made, updated with the algorithms used for High Quality Playback, which wasn't a thing in 2010.
| Algorithm | Description | When is it used? |
| Nearest neighbor | Super fast, only blocky | For some formats when yous reduce Playback Resolution in the Programme Monitor. |
| Bilinear | Very fast, merely not the best quality. | Used for playback when High Quality Playback is not enabled. |
| Gaussian low-pass sampled with bilinear | Fast, merely a bit soft. | Used when yous export in Software style with Max Render Quality off. Likewise used in Software mode when playback is paused. |
| Variable-radius bicubic | Slow, only sharper. Similar to the standard bicubic mode in Photoshop. | Used for export in Software manner when Max Render Quality is enabled. |
| Lanczos 2 low-pass sampled with bicubic. Also described as modified bicubic with a scale-dependent pre-filter. | The all-time all-round scaling algorithm. Pretty advanced, but since it's only bachelor in GPU manner it's still fast. | Used in GPU mode for export, and when playback is paused. Besides used in GPU mode when High Quality Playback is enabled. |
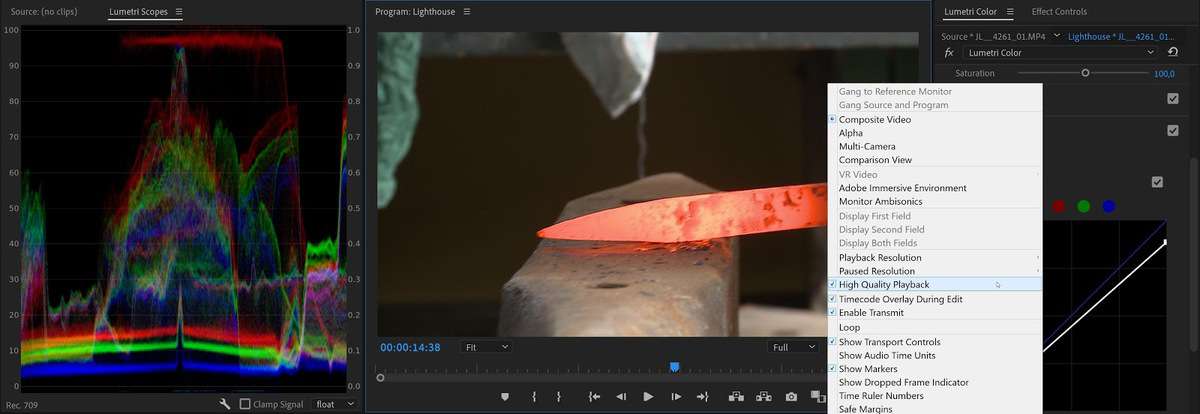
You don't ordinarily see full quality in the program monitor
Equally you lot tin see in the table above, Premiere Pro uses a fast, lower-quality algorithm for Playback by default. This makes playback less demanding and may be the only workable option on less capable systems. To see what you lot'll get on export, and accurately judge the results, y'all'll have to enable Loftier Quality Playback in the Programme Monitor settings menu.
With High Quality Playback enabled, Premiere Pro plays and scrubs the paradigm using the same quality that'south used when the Playhead is paused. So yous might observe that your organisation struggles and starts dropping frames. In that'south the case, turn this feature off.
Your choices in Sequence Settings don't matter that much
As we've seen (and to make things more than complicated), both settings are available both in the sequence and in the export settings. If y'all take a look at the tests at the terminate of this commodity, you'll see that your sequence settings have no affect on the quality of the exported file.
But if y'all desire to know what y'all're exporting, the sequence settings and the export settings have to match. If they're gear up differently, the output won't be the aforementioned as what you saw while editing. So I recommend that you keep MRQ and MBD settings matched.
Max Render Quality also affects the way color is rendered
As you'll see in the Sequence settings, the Composite in Linear Color setting depends on GPU acceleration or Max Render Quality. So if this is on, as it is by default, activating Max Return Quality will also activate Composite in Linear Color when you lot're in Software mode. And this will bear upon how your compositing, cross-dissolves, and color grading will expect.
In Software mode, this as well makes Premiere Pro alloy in linear colour for frame blending when you change Speed/Elapsing.
Max Render Quality affects how some formats are decoded
As we've seen, the Max Return Quality setting usually has no touch on on our exports in GPU mode, because a superior scaling algorithm will exist used on the GPU. Only even with GPU rendering, MRQ can improve quality when working with footage that supports fractional resolution (Wavelet codecs, like RED for example), using full-resolution sources instead of a fractional resolution for the export when the prototype has been scaled downwardly. See Test fourteen.
Co-ordinate to engineers and developers from Adobe, MRQ affects decisions made past RED, PNG, JPEG, HIEC, HIEF and WEBP importers. And they mention that this list will alter over time, also equally what impact MRQ has on them.
Common Misconceptions
There are some statements that you lot'll often see in forums, books and articles—even past Adobe evangelists—that don't hold up to scrutiny. And then let's clear these up.
"Maximum Render Quality only affects scaling"
There are many versions of this misconception, merely it commonly goes a fleck similar this.
"Using Maximum Return Quality will non assist unless you lot're scaling upwards or down".
Wrong. Information technology also kicks in if you're changing Rotation, Position, and other Transforms, or the Warp Stabilizer, which also does some scaling and other Transforms. But information technology only affects Software rendering. See Examination nine
"Maximum Bit Depth doesn't help if your source or destination file is viii-fleck"
Since a lot of source files are viii-bit and we frequently export to eight-bit codecs, people tend to think that we don't take to render effects in 32-fleck. Here are 2 common statements.
"Yous don't accept to check Maximum Bit Depth, because H.264 and YouTube is 8-bit anyway."
"You don't demand Maximum Bit Depth if your source material is viii-bit."
Wrong. Fifty-fifty when the source and export are 8-bit, doing the decoding and all the internal calculations at 32-bit accuracy will brand sure your consecutive adjustments (say, Lumetri on the source prune and a LUT or tweak on an added Aligning Layer) don't innovate clipping, banding and posterization.
This affects both GPU rendering and Software rendering, every bit y'all can encounter in Tests 3, 4 and five.
Unfortunately, none of the presets in the new Quick Export take Maximum Flake Depth set. So, to get less banding and blocking when exporting using the standard export method, cull the same preset, you should activate MBD.
"When you take GPU acceleration enabled, the settings don't matter"
This is true for MRQ, merely just if your timeline does not accept a red render bar due to non-accelerated effects, which forces y'all into Software rendering. For Max Bit Depth, information technology's simply true if you oasis't added whatsoever effects. See Exam 3, 4, 7 and 8.
"The consign will match what you run into in the plan monitor"
Non entirely truthful. To get WYSIWYG in the Programme Monitor during playback, not just when playback is paused, you'll have to enable High Quality Playback in the programme monitor panel carte du jour.
Effects and transitions similar Morph Cut and Optical Flow need to be rendered to come across the actual result. Also, when yous're rendering previews, yous'll need to return to a expert codec, or else the outcome will not match your output.
If information technology's rendered to the default I-frame Only MPEG-2 codec, you lot'll get a bad preview compared to ProRes, DNxHR or CineForm codecs, which provide better-quality previews.
So it'due south all-time to apply codecs that are and then good you tin can apply them for consign, enabling Use Previews in the export settings. Ideally, you should use the verbal same format as you'll utilize when you consign your master file to get super-fast Smart Rendering and eliminate re-transcoding.
Render Previews if you're editing in Software fashion. During playback in Software mode, you'll not become 32-bit rendering. Effects and compositing tin can look very unlike before and after rendering.
For instance, graphics might get jagged edges during playback, and Linear compositing won't be applied, which changes the look of blending modes, etc. By rendering your previews, you lot'll get to see them in total quality, which is useful if your system can't handle Loftier Quality Playback.
Summing upwards
These MRQ and MBD settings bear upon the video quality at iii dissimilar stages in the pipeline. The importer/decoder can be viii-flake or 32-bit, the processing of furnishings and transforms can be washed in eight-scrap or 32-bit, and finally the exporter tin can render to eight-scrap, ten-bit, 16-bit, etc.
As we've seen, where these settings really thing is in your Export settings. Both Max Render Quality and Max Scrap Depth accept an impact on your image quality, although Max Return Quality more often than not only kicks in when yous're in Software mode (which is entirely possible even with GPU acceleration turned on, see Test 11).
Information technology's hard to be definitive, but in many (well-nigh?) cases, leaving the settings on will not affect the export time.
For some sources, MRQ tin make a divergence even in GPU mode. MBD in consign settings tin also touch on how some formats are decoded, even in GPU mode, well-nigh notably ProRes.
And finally, yous should always enable 16-chip Depth for formats where this pick is bachelor.
Unfortunately, in both Sequence Settings and in Export Settings, the defaults don't have these settings enabled, so yous'll have to intervene to get the best quality video in Premiere Pro. The Quick Export has none of these settings enabled, and there'due south no way you can change information technology.
If y'all want practiced quality video, always enable Maximum Flake Depth and Maximum Render Quality, and choose 16-fleck instead of viii-fleck for formats with a pick for Depth.
With all of this in mind, I recommend that you always have MBD and MRQ enabled in your export settings. If yous want WYSIWYG, y'all should also enable both of them settings in your sequences. If your system struggles you may want to turn them off, and see if the exported files still meet your quality standards, knowing that it's not height quality.
Virtually of the fourth dimension, the settings will practice cypher at all, but they volition kicking in when needed, and ensure the all-time possible quality.
Here's what I do
You may be wondering what choices I have made, and how I set up up my workflow. Here you go.
- I use Sequence Presets that have both settings activated
- The Sequence Presets use ProRes 422 HQ to get loftier-quality preview renders
- I've made a ProRes 422 HQ Export Preset with both settings activated
- The Consign Preset also has Use Previews, and xvi-scrap Depth activated
The export to a master file is very quick if I've rendered parts of the timeline where there's a red render bar, due to Smart Rendering (come across Test 1 and 6). Of form, I don't always have to render, but I sometimes return during breaks or when I'm on the phone, to salve time on concluding export when Smart Rendering kicks in.
I besides use Render & Replace for dynamic link comps, titles, MOGRTs etc.
For longer projects I will set up spotter folders in Adobe Media Encoder to automatically take my exported master file and output the h.264 versions, using a preset with Maximum Bit Depth and Maximum Render Quality enabled. But for short-form projects I normally simply queue these exports, which is fast and easy.
I promise the info in this article enables you to make qualified choices for these settings for future projects. This should enable yous to improve your paradigm quality and yield fewer surprises when you lot consign your films.
Testing, testing
In the interests of transparency, here are the tests. (They were run on a 7-year sometime laptop, so you lot may express joy at some of the export times.)
Each exam was an consign of the aforementioned timeline with different settings enabled, with MRQ and MBD enabled and disabled, with and without GPU rendering, scaling on/off, etc. Hither are the basic sequence settings and export settings.
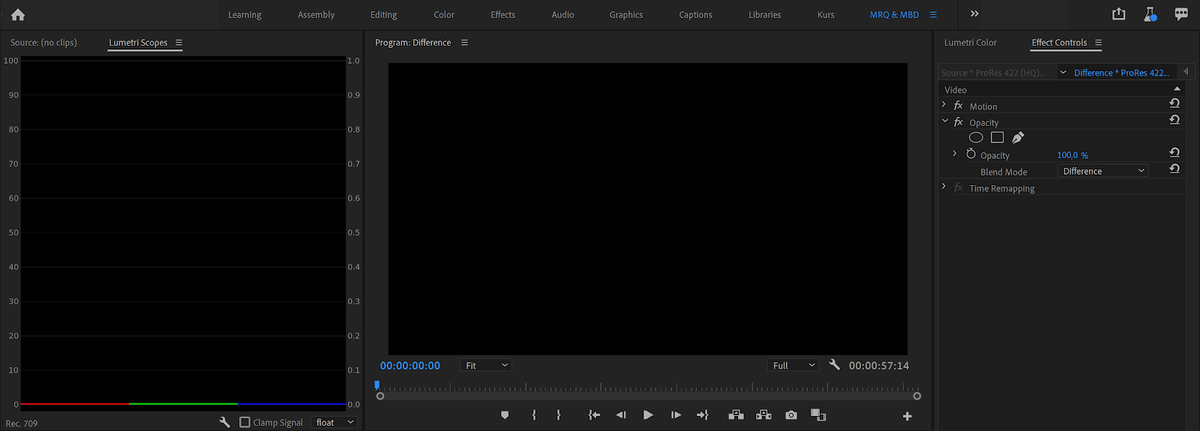
During each export, I monitored the CPU and GPU usage, and timed every export. After each export, I performed a Divergence Style exam, to meet if whatsoever pixels had different values in the unlike versions.
My master testing timeline was a minute long and contained a 10-2nd clip repeated half-dozen times. The source file was 1920x1080px, ProRes 422 HQ, 29.97 fps, progressive. (This matched the export, and then in the first test, Smart Rendering kicked in, and the export fourth dimension was very short.) I also did a test with Cherry RAW footage.
Let me preface this by saying that these tests are non scientific. I had other software running in the background, and I timed the exports using the stopwatch app on my smartphone, so the timing may be off past at least one second, perchance more than. Just they're enough for us to see how different settings bear on the exported file and the time the consign takes.
Test 1: Consign to ProRes 422 HQ, No effects
| # | Sequence | Consign | GPU | Export Time | GPU Usage |
| A | MBD off | MBD off | CUDA | nine sec | - |
| B | MBD on | MBD off | CUDA | 9 sec | - |
| C | MBD off | MBD on | CUDA | nine sec | - |
| D | MBD on | MBD on | CUDA | viii sec | - |
| E | MBD off | MBD off | Off | ix sec | - |
| F | MBD on | MBD off | Off | 9 sec | - |
| K | MBD off | MBD on | Off | 8 sec | - |
| H | MBD on | MBD on | Off | nine sec | - |
Conclusion: When no effects are added, Premiere Pro uses Smart Rendering on this sequence, regardless of the Maximum Scrap Depth value in the Sequence and Export settings. This is indicated by the very depression CPU usage. Virtually null processing is going on, and the export is super fast.
Test ii: Comparing of exported files from test 1, Difference mode, No effects
| # | Comparison (Difference Mode) | Program Monitor | Waveform Telescopic |
| A | Files from A and Eastward in test 1 | Black | Flat line |
| B | Files from A and F in test 1 | Blackness | Flat line |
| C | Files from A and G in examination 1 | Black | Flat line |
| D | Files from A and H in examination ane | Black | Flat line |
| E | Files from A and B in test 1 | Blackness | Apartment line |
| F | Files from A and C in examination 1 | Black | Flat line |
| One thousand | Files from A and D in exam 1 | Black | Flat line |
Decision: All the files are identical. I could see no difference in the program monitor or in the scopes—the waveforms were a straight flat line. They were as well exactly the aforementioned size, down to the byte.
Test iii: Export to ProRes 422 HQ, with Lumetri issue (RGB Bend), GPU enabled
| # | Sequence | Export | GPU | Consign Time | GPU Usage |
| A | MBD off | MBD off | CUDA | 25 sec | 40-90% |
| B | MBD on | MBD off | CUDA | 26 sec | twoscore-90% |
| C | MBD off | MBD on | CUDA | 38 sec | 40-90% |
| D | MBD on | MBD on | CUDA | 39 sec | xl-ninety% |
The CPU was constantly effectually 100% on all cores, and GPU usage was between 40-90% for all exports. Only when the export setting is inverse does the file size differ, and a fuzzy line shows in the scopes. Files exported with MBD on in consign settings are identical (downwards to the byte) no matter what the sequence setting is. Files exported with MBD off in export settings are as well identical (down to the byte) no thing what the sequence setting is.
Conclusion: Consign settings affect export times, and what algorithm is used. Sequence settings do not touch on the exported files, unless you enable Use Previews in the export settings.
Test four: Export to ProRes 422 HQ, with Lumetri issue (RGB Bend), GPU disabled
| # | Sequence | Export | GPU | Export Fourth dimension | GPU Usage |
| A | MBD off | MBD off | Off | 2 min 14sec | – |
| B | MBD on | MBD off | Off | 2 min 16 sec | – |
| C | MBD off | MBD on | Off | 2 min 30 sec | – |
| D | MBD on | MBD on | Off | 2 min 28 sec | – |
The CPU was constantly around 100% on all cores for all exports. When the export setting is inverse the file sizes differ, and a fuzzy line too shows in the scopes. Files exported with MBD on in consign settings are identical (down to the byte) no matter what the sequence setting is. Files exported with MBD off in export settings are also identical (downwardly to the byte) no affair what the sequence setting is.
Conclusion: Export settings affect export times, and what algorithm is used, simply sequence settings practise not, unless you enable Utilize Previews in the export settings.
Examination 5: Departure mode, with Lumetri consequence (RGB Bend)
| # | Comparison (Departure Fashion) | Program Monitor | Waveform Scope |
| A | Off-off GPU vs on-off GPU | Blackness | Flat line |
| B | Off-off GPU vs off-on GPU | Black | Fuzzy line |
| C | Off-off GPU vs on-on GPU | Blackness | Fuzzy line |
| D | Off-off CPU vs off-on CPU | Blackness | Fuzzy line |
| East | Off-off CPU vs on-off CPU | Black | Apartment line |
| F | Off-off CPU vs on-on CPU | Black | Fuzzy line |
| G | All GPU vs CPU | Black | Fuzzy line |
Conclusion: Premiere Pro uses slightly unlike algorithms in CPU and GPU mode, then files exported with GPU enabled and GPU disabled are slightly different. The consign settings make an impact on the exported file—sequence settings have no influence on the exported file, unless yous enable Use Previews in the consign settings.
Test 6: Export to ProRes 422 HQ, no scaling
| # | Sequence | Export | GPU | Export Time | GPU Usage |
| A | MRQ off | MRQ off | CUDA | 8 sec | - |
| B | MRQ on | MRQ off | CUDA | 8 sec | - |
| C | MRQ off | MRQ on | CUDA | 8 sec | - |
| D | MRQ on | MRQ on | CUDA | 8 sec | - |
| E | MRQ off | MRQ off | Off | 8 sec | - |
| F | MRQ on | MRQ off | Off | 8 sec | - |
| G | MRQ off | MRQ on | Off | 8 sec | - |
| H | MRQ on | MRQ on | Off | eight sec | - |
Conclusion: When no scaling is going on, Premiere Pro uses Smart Rendering, and all the exported files are identical.
Test 7: Export to ProRes 422 HQ, with scaling set to 120%
| # | Sequence | Export | GPU | Export Time | GPU Usage |
| A | MRQ off | MRQ off | CUDA | 25 sec | forty-85% |
| B | MRQ on | MRQ off | CUDA | 25 sec | 40-85% |
| C | MRQ off | MRQ on | CUDA | 25 sec | xl-85% |
| D | MRQ on | MRQ on | CUDA | 25 sec | 40-85% |
| E | MRQ off | MRQ off | Off | 35 sec | – |
| F | MRQ on | MRQ off | Off | 35 sec | – |
| Grand | MRQ off | MRQ on | Off | 3 min 55sec | – |
| H | MRQ on | MRQ on | Off | 3 min 55sec | – |
The CPU was constantly around 100% on all cores for all exports. Files exported with MBD on in export settings are identical (down to the byte) no matter what the sequence setting is. Files exported with MBD off in export settings are also identical (downward to the byte) no matter what the sequence setting is. Files exported with GPU enabled and GPU disabled are slightly unlike.
Conclusion: Export settings affect export times in Software mode, and what algorithm is used, but Sequence settings have no impact on the exported files, unless you enable Use Previews in the export settings.
Exam 8: Difference fashion, with scaling
| # | Comparison (Departure Mode) | Program Monitor | Waveform Telescopic |
| A | All GPU vs GPU | Black | Flat line |
| B | GPU vs off-off CPU | Black | Fuzzy line |
| C | GPU vs on-off CPU | Black | Fuzzy line |
| D | GPU vs off-on CPU | Black | Fuzzy line |
| E | GPU vs on-on CPU | Blackness | Fuzzy line |
| F | On-off CPU vs off-off CPU | Black | Apartment line |
| G | On-off CPU vs off-on CPU | Black | Fuzzy line |
| H | Off-on CPU vs on-on CPU | Blackness | Flat line |
Files exported with MBD on in export settings are identical (down to the byte) no thing what the sequence setting is. Files exported with MBD off in export settings are likewise identical (down to the byte) no affair what the sequence setting is. Only when the export setting is changed does the file size differ, and a fuzzy line shows in the scopes.
Conclusion: Premiere Pro uses slightly unlike algorithms in CPU and GPU mode. Export settings affect consign times, and what algorithm is used, but Sequence settings have no touch on on the exported files, unless you enable Use Previews in the export settings.
Test 9: Export to ProRes 422 HQ, with rotation set to 10 degrees, no scaling
| # | Sequence | Export | GPU | Consign Time | GPU Usage |
| A | MRQ off | MRQ off | CUDA | 27 sec | forty-95% |
| B | MRQ on | MRQ off | CUDA | 26 sec | forty-95% |
| C | MRQ off | MRQ on | CUDA | 25 sec | 40-95% |
| D | MRQ on | MRQ on | CUDA | 25 sec | 40-95% |
| E | MRQ off | MRQ off | Off | 37 sec | – |
| F | MRQ on | MRQ off | Off | 37 sec | – |
| G | MRQ off | MRQ on | Off | 5 min 26sec | – |
| H | MRQ on | MRQ on | Off | five min 26sec | – |
CPU was constantly around 100% on all cores for all exports. Files exported with MBD on in consign settings are identical (downwards to the byte) no matter what the sequence setting is. Files exported with MBD off in export settings are too identical (down to the byte) no affair what the sequence setting is.
Conclusion: Premiere Pro uses slightly unlike algorithms in CPU and GPU mode. Export settings affect export times, and what algorithm is used, only Sequence settings take no impact on the exported files, unless you enable Employ Previews in the export settings.
Test 10: Divergence mode, with rotation set to 10 degrees, no scaling
| # | Comparison (Sequence Export) | Programme Monitor | Waveform Scope |
| A | All GPU vs GPU | Black | Flat line |
| B | GPU vs off-off CPU | Black | Fuzzy line |
| C | GPU vs on-off CPU | Black | Fuzzy line |
| D | GPU vs off-on CPU | Black | Fuzzy line |
| E | GPU vs on-on CPU | Blackness | Fuzzy line |
| F | On-off CPU vs off-off CPU | Black | Flat line |
| Thou | On-off CPU vs off-on CPU | Black | Fuzzy line |
| H | Off-on CPU vs on-on CPU | Black | Flat line |
All files exported with GPU enabled are identical, no matter what the sequence or export settings are. Files exported with GPU disabled with MRQ off are identical whatsoever the sequence settings are. Files exported with GPU disabled with MRQ on are identical) whatever the sequence settings are.
Conclusion: Premiere Pro uses slightly different algorithms in CPU and GPU mode. Only when the consign settings are changed does the file size differ, and a fuzzy line shows in the scopes. Sequence settings have no impact on the exported files, unless y'all enable Apply Previews in the export settings.
Test xi: Export to ProRes 422 HQ, with scaling at 120% and Unsharp Mask effect at 0%
| # | Sequence | Export | GPU | Export Time | GPU Usage |
| A | MRQ on | MRQ on | CUDA | 3 min 56 sec | – |
| B | MRQ on | MRQ on | Off | 3 min 54 sec | – |
CPU was constantly around 100% on all cores for all exports. The two files are identical, down to the byte. GPU was non used, even though GPU acceleration was enabled.
Conclusion: Adding a non-accelerated effect to a clip forces Premiere into software only mode for the duration of the prune, even when the GPU acceleration is enabled in Project settings.
Test 12: Carmine source, Export to ProRes 422 HQ, MBD settings
| # | Sequence | Export | GPU | Export Fourth dimension | GPU Usage |
| A | MBD off | MBD off | CUDA | 49 sec | 0-ninety% |
| B | MBD off | MBD on | CUDA | fifty sec | 0-90% |
| C | MBD on | MBD off | CUDA | 49 sec | 0-90% |
| D | MBD on | MBD on | CUDA | 50 sec | 0-xc% |
| E | MBD off | MBD off | Off | 4 min 11 sec | – |
| F | MBD off | MBD on | Off | four min 31 sec | – |
| G | MBD on | MBD off | Off | iv min 11 sec | – |
| H | MBD on | MBD on | Off | four min 29 sec | – |
The test was performed with a 5.five seconds clip, R3D REDCODE eight:1, 3792x3160px (anamorphic), with Lumetri (RGB Curves), exported to ProRes 422 HQ at the same size. CPU usage was around 50% on all cores for all exports with GPU, and effectually 30-twoscore% without the GPU.
The iv files exported with GPU enabled are identical, down to the byte, and difference style shows a straight line in the waveform telescopic. When comparing exports done with and without MBD with GPU disabled, the line is fuzzy. When comparing exports done with MBD with GPU disabled, the line is straight, and the files are identical, down to the byte. When comparing exports done without MBD with GPU disabled, the line is directly, and the files are identical, down to the byte.
Conclusion: The MBD setting in the export settings affects return times and the exported file but in Software mode. The MBD switch in the sequence settings does not bear on the final return unless you cheque Use Previews in the consign settings.
Test thirteen: Crimson source, Scaled, Export to ProRes 422 HQ, MRQ settings
| # | Sequence | Export | GPU | Consign Fourth dimension | GPU Usage |
| A | MRQ off | MRQ off | CUDA | 41 sec | 0-50% |
| B | MRQ off | MRQ on | CUDA | 41 sec | 0-fifty% |
| C | MRQ on | MRQ off | CUDA | 41 sec | 0-50% |
| D | MRQ on | MRQ on | CUDA | 41 sec | 0-50% |
| Eastward | MRQ off | MRQ off | Off | ane min 50 sec | – |
| F | MRQ off | MRQ on | Off | 5 min 55 sec | – |
| G | MRQ on | MRQ off | Off | one min 51 sec | – |
| H | MRQ on | MRQ on | Off | 5 min 54 sec | – |
The test was done with a 5.v seconds clip, R3D REDCODE eight:1, 3792x3160px (anamorphic), scaled to 120%, exported to ProRes 422 HQ at the same size.
CPU usage was around 60% on all cores for all exports with GPU, nigh 50% for software exports without MRQ, and around 30-40% for software exports with MRQ. That feels kind of backwards, but that's what the examination showed.
All four files exported with GPU enabled are identical, down to the byte. The files exported with MRQ off and GPU acceleration off were identical, down to the byte. The files exported with MRQ on and GPU acceleration off were likewise identical, downwards to the byte.
Determination: when you're in GPU style, this setting does not matter (unless you have source files that support fractional resolutions). When you lot're in Software fashion, MRQ in export settings does touch on the exported prune, while the sequence setting does not, unless you cheque Use Previews in consign settings.
Test 14: Ruby source, Scaled to HD, Consign to ProRes 422 HQ, MRQ settings
| # | Sequence | Export | GPU | Export Time | GPU Usage |
| A | MRQ off | MRQ off | CUDA | x sec | 20-thirty% |
| B | MRQ off | MRQ on | CUDA | 14 sec | ninety-100% |
The test was done with a 5.v seconds clip, R3D REDCODE 8:1, 3792x3160px (anamorphic), scaled to Hd size using Fix to Frame Size (25.3%) exported to ProRes 422 HQ HD.
CPU usage was 100% on all cores for both exports. The files are not identical at all, and a Deviation mode test shows a thick fuzzy line. Surprisingly, the export done without MRQ seems sharper than the one exported with MRQ. But it's besides more pixelated, so leaving MRQ on results in a more pleasant-looking paradigm with less noise.
Decision: With MRQ on, Premiere uses the full res prototype to create the depression-res output. Without MRQ, it uses a partial resolution (half-res, quarter-res, etc.) that wavelet-based codecs like RED and some other formats accept congenital-in. Even with GPU enabled, MRQ will affect exports of these formats.
Test 15: Cineform source, Scaled to Hd, Export to ProRes 422 HQ, MRQ settings
| # | Sequence | Export | GPU | Consign Fourth dimension | GPU Usage |
| A | MRQ off | MRQ off | CUDA | eight sec | 50-100% |
| B | MRQ off | MRQ on | CUDA | eight sec | 50-100% |
The test was done with a 5.5 seconds prune, GoPro Cineform, 3792x1580px made from the Reddish clip.
The clip was scaled to HD size using Set to Frame Size (50,6%) exported to ProRes 422 HQ HD.CPU usage was 100% on all cores.
The clips are well-nigh identical, but non quite (144 bytes departure in size). In Premiere, the scopes show a perfectly flat line, though, then the image quality is exactly the aforementioned.
I ran the test again with scale set to l%, and the two files were identical.
Determination: Premiere Pro is probably not using partial resolutions when scaling Cineform clips without MRQ enabled. Information technology may exist using fractional resolutions only when scaling to less than 50%.
Test sixteen: JPEG2k source, Scaled to HD, Export to ProRes 422 HQ, MRQ settings
| # | Sequence | Export | GPU | Export Time | GPU Usage |
| A | MRQ off | MRQ off | CUDA | 38 sec | 20-50% |
| B | MRQ off | MRQ on | CUDA | 39 sec | 20-50% |
The test was done with a 5.5 seconds clip, JPEG2000, 3792×1580, made from the Blood-red clip.
The clip was scaled to Hard disk drive size using Set to Frame Size (50.6%) exported to ProRes 422 HQ HD. CPU usage was 100% on all cores.
The files are identical, downwards to the byte. I did the test again with calibration set up to exactly 50%, and again those 2 files were identical.
Conclusion: Premiere Pro does not employ partial resolutions when scaling JPEG2000 clips, unless it'southward only used when scaling to less than fifty%.
Test 17: Sony RAW Source, Scaled to HD, Consign to ProRes 422 HQ, MRQ settings
| # | Sequence | Export | GPU | Export Fourth dimension | GPU Usage |
| A | MRQ off | MRQ off | CUDA | xiii sec | 50-90% |
| B | MRQ off | MRQ on | CUDA | 13 sec | 50-xc% |
The examination was done with a 5.5 seconds Sony RAW clip. The clip was scaled to HD size using Set to Frame Size (46.9%) exported to ProRes 422 HQ HD. CPU usage was 100% on all cores.
The files are identical.
Conclusion: Premiere Pro does not use partial resolutions when scaling Sony RAW clips.

How To Change Render Settings In Premiere Pro,
Source: https://blog.frame.io/2021/06/07/premiere-pro-max-render-quality-max-bit-depth/
Posted by: cherryspatim.blogspot.com
0 Response to "How To Change Render Settings In Premiere Pro"
Post a Comment